
Assessing the Damage
Before choosing a repair method, you must determine how deep the scratch is.
- Surface Scratches: These are light scuffs that only affect the clear protective finish (polyurethane) and haven’t penetrated the wood itself.
- Minor Scratches: These penetrate through the finish and slightly into the wood, exposing the lighter-colored raw wood beneath.
- Deep Scratches and Gouges: These are significant indentations that penetrate deeply into the wood fibers.
Repairing Surface Scratches
If the scratch is only in the clear coat, the repair is simple.
The Blending Method
For very light scuffs, sometimes simply cleaning the area and applying a specialized hardwood floor cleaner or restorer is enough to blend the scratch into the surrounding finish.
The Walnut Trick
For slightly more visible surface scratches, grab a raw walnut. Rub the meat of the walnut diagonally across the scratch. The natural oils in the nut will darken the scratch and blend it into the finish. Let it sit for a few minutes, then buff the area with a soft cloth.
Repairing Minor Scratches
When the scratch has penetrated the stain and exposed raw wood, you need to add color back in.
Wood Stain Markers
Wood stain markers (or touch-up pens) are the easiest way to fix minor scratches. They are available at any hardware store in various wood tones (oak, cherry, walnut, etc.).
- Clean the scratched area with a damp cloth and let it dry.
- Test the marker on an inconspicuous area to ensure the color matches. It’s better to start with a lighter shade; you can always add a second coat to darken it.
- Draw over the scratch with the marker.
- Immediately wipe away any excess stain from the surrounding finish with a clean rag.
Blending Pencils or Wax Sticks
Similar to markers, wax blending sticks fill the scratch with colored wax. Rub the stick firmly over the scratch until it is filled, then use a plastic scraper or an old credit card to level the wax flush with the floor. Buff with a soft cloth.
Repairing Deep Scratches and Gouges
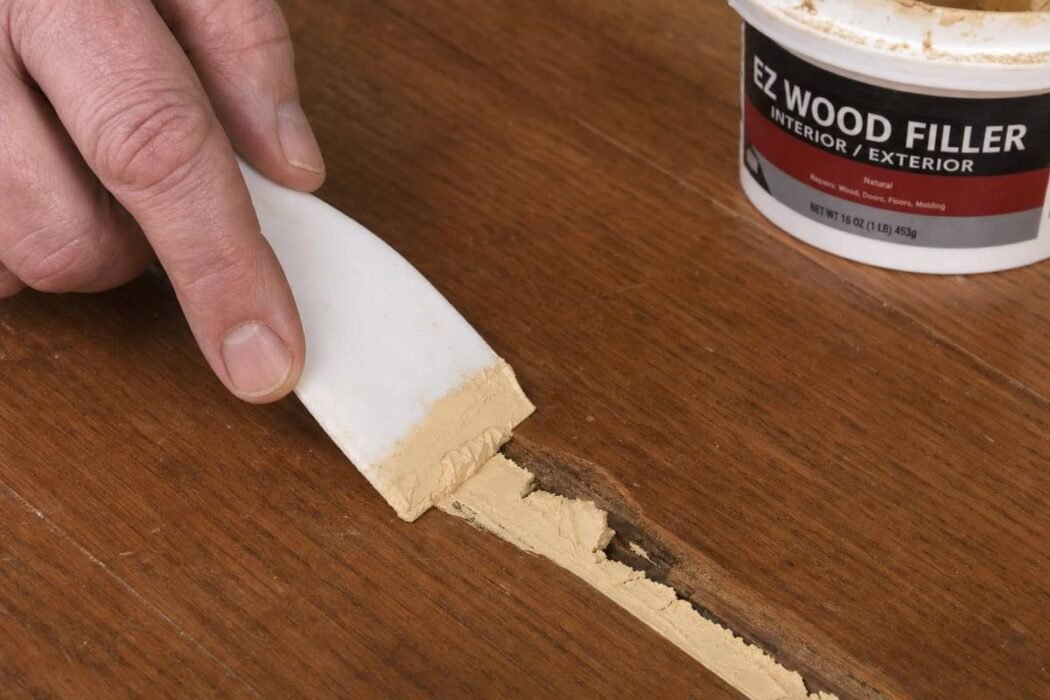
Deep gouges require filling the physical indentation before addressing the color and finish.
Wood Putty or Filler
- Clean and Prep: Clean the gouge thoroughly. Use the tip of a utility knife to gently scrape out any loose splinters.
- Apply Filler: Choose a wood putty that matches the color of your floor (or a stainable wood filler if you plan to stain it yourself). Use a plastic putty knife to press the filler into the gouge. Leave it slightly mounded above the surface, as it will shrink slightly as it dries.
- Sand: Once completely dry (check manufacturer instructions), use fine-grit sandpaper (220-grit) to gently sand the filler flush with the surrounding floor. Be very careful not to sand the surrounding finish.
- Stain and Finish: If using stainable filler, apply stain with a cotton swab. Once dry, apply a thin layer of polyurethane over the patch using a small artist’s brush to protect it and match the sheen of the floor.
| Scratch Depth | Recommended Repair Method | Tools Needed |
|---|---|---|
| Surface (Finish only) | Walnut trick or floor restorer | Raw walnut, soft cloth |
| Minor (Into wood) | Stain marker or wax stick | Touch-up pen, rag |
| Deep (Gouge) | Wood putty/filler | Putty, plastic scraper, sandpaper, finish |
When to Call a Professional
If your floor has widespread, deep scratching across a large area, or if the finish is wearing off entirely in high-traffic zones, spot repairs will look patchy and uneven. In this case, the floor needs to be professionally sanded down to bare wood and completely refinished. Solid hardwood can be refinished multiple times; engineered hardwood can usually be refinished once or twice, depending on the thickness of the top veneer.
Frequently Asked Questions
Can I use olive oil and vinegar to fix scratches?
A mixture of 3 parts olive oil to 1 part white vinegar is a popular internet hack for light scratches. It works temporarily by moisturizing the exposed wood and darkening it, but it does not repair the protective finish and will eventually dry out or attract dirt. Stain markers are a better permanent solution.
How do I prevent scratches on my hardwood floors?
Prevention is the best cure. Place felt pads under the legs of all furniture. Use area rugs in high-traffic areas. Keep pet nails trimmed. Avoid wearing high heels or cleats indoors. Sweep or vacuum regularly to remove grit that acts like sandpaper underfoot.
Will a magic eraser remove scuff marks from hardwood?
Magic Erasers are highly abrasive (like ultra-fine sandpaper). While they will remove a rubber shoe scuff, they will also dull or remove the polyurethane finish on your floor. It is better to use a tennis ball or a specialized floor cleaner to rub out rubber scuffs.
Can I use regular wood filler on hardwood floors?
Yes, but ensure you choose a filler that is either pre-colored to match your floor or specifically labeled as “stainable.” Non-stainable filler will not accept color and will stand out glaringly.
Does mayonnaise fix wood scratches?
Similar to the olive oil trick, mayonnaise contains oils that can temporarily darken a scratch and make it less visible, but it is not a permanent repair and can leave a greasy residue.
Conclusion
Scratches are an inevitable part of living with hardwood floors, but they don’t have to ruin the look of your home. By accurately assessing the depth of the scratch and using the right tools—from a simple walnut for surface scuffs to wood putty for deep gouges—you can seamlessly repair the damage and keep your hardwood floors looking beautiful for decades.