
Step 1: Prepare and Test the Concrete
The success of your laminate installation depends entirely on the condition of the concrete subfloor.
Clean and Clear: Remove all carpet, tack strips, glue, and debris. Sweep and vacuum the concrete thoroughly.
Check for Level: Laminate requires a flat surface. Use a long straightedge or a level to check the floor. The industry standard is a variance of no more than 3/16 inch over a 10-foot span.
Leveling: If you find low spots, fill them with a Portland cement-based self-leveling compound. If you find high spots, you will need to grind them down using a concrete grinder.
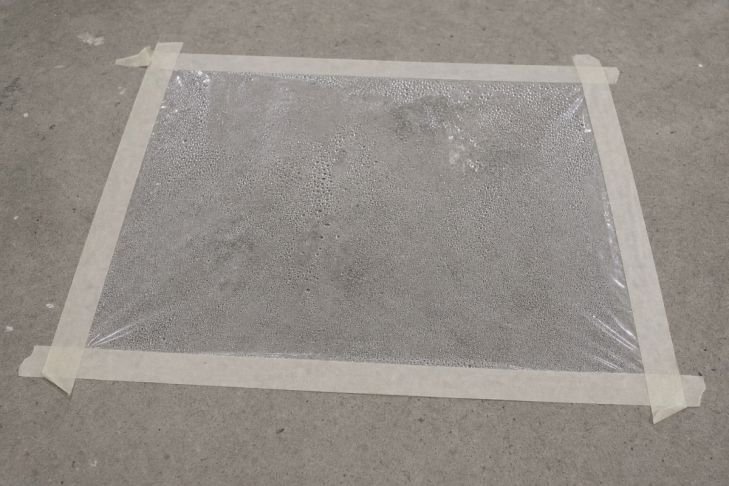
Moisture Testing: Concrete is porous and constantly emits moisture vapor. Tape a 2-foot by 2-foot square of clear plastic sheeting to the concrete, sealing all edges with duct tape. Leave it for 48 hours. If condensation forms under the plastic, or if the concrete is dark, you have a moisture problem that must be addressed with a specialized moisture barrier before proceeding.
Step 2: Acclimate the Laminate
Laminate flooring is made of high-density fiberboard (HDF), which expands and contracts with changes in temperature and humidity. You must acclimate the flooring to the room where it will be installed. Leave the unopened boxes of laminate in the room for at least 48 to 72 hours before installation.
Step 3: Install the Vapor Barrier and Underlayment
Because concrete emits moisture, a vapor barrier is absolutely mandatory to protect the laminate from warping and buckling.
- Vapor Barrier: Lay down a 6-mil polyethylene plastic sheet over the entire concrete floor. Overlap the seams by 8 inches and tape them securely with moisture-resistant tape. Run the plastic about 2 inches up the walls (it will be covered by baseboards later).
- Underlayment: Next, install the foam underlayment. This provides cushioning, sound absorption, and minor imperfection smoothing. Roll it out perpendicular to the direction you will lay the laminate planks. Butt the edges together (do not overlap) and tape the seams.
Note: Some premium laminate flooring comes with a pre-attached underlayment. If yours does, you still need the 6-mil plastic vapor barrier, but you do not need a separate foam underlayment.
Step 4: Plan the Layout
For the best visual effect, lay the planks parallel to the longest wall or the main light source (like a large window). Measure the width of the room and divide by the width of a plank. This tells you how many rows you need. If the final row will be less than 2 inches wide, you should rip (cut lengthwise) the first row so that the first and last rows are roughly equal in width.
Step 5: Install the First Row
- Spacers: Laminate needs room to expand. Place 1/4-inch to 3/8-inch spacers (check manufacturer instructions) against the walls.
- First Plank: Place the first plank in the corner with the tongue side facing the wall.
- Connecting Planks: Take the second plank, insert its end tongue into the end groove of the first plank at a slight angle, and press down to lock it in place. Continue to the end of the row.
- Cutting the Last Plank: Measure the gap at the end of the row (don’t forget the expansion gap). Cut a plank to fit.
Step 6: Install Subsequent Rows
- Stagger the Seams: Use the leftover cut piece from the first row to start the second row, provided it is at least 8 inches long. This staggers the end joints, which is crucial for structural stability and visual appeal. End joints in adjacent rows should be staggered by at least 8 inches.
- Click and Lock: Insert the long edge tongue of the new plank into the groove of the previous row at an angle. Slide it down toward the adjacent plank in the same row, then press down to lock the long edge. Use a tapping block and a rubber mallet to gently tap the end joint together.
- Continue: Repeat this process across the room.
Step 7: The Final Row and Finishing Touches
The final row will likely need to be ripped lengthwise to fit. Measure the space (minus the expansion gap) and cut the planks. Use a pull bar to pull the final row tight against the previous row.
Once the floor is laid, remove all spacers. Install baseboards and quarter-round molding to cover the expansion gaps around the perimeter. Nail the molding to the wall, never to the floor, as the floor must be free to float.
Frequently Asked Questions
Do I really need a vapor barrier over concrete?
Yes, absolutely. Concrete continuously releases moisture vapor. Without a 6-mil plastic vapor barrier, the HDF core of the laminate will absorb this moisture, causing the planks to swell, warp, and buckle, ruining the floor.
Can I put laminate in a basement?
Yes, laminate is a great choice for basements, provided the basement does not have active water leaks or flooding issues. You must ensure the concrete is level and use a proper vapor barrier.
What happens if the concrete is not level?
If the concrete has dips or bumps, the laminate planks will flex when walked on. This flexing puts stress on the locking mechanisms, causing them to break or separate over time, leading to gaps in the floor.
Do I need underlayment if my laminate has it attached?
If your laminate has a pre-attached pad, you do not need an additional foam underlayment. However, if installing over concrete, you still need a 6-mil plastic vapor barrier beneath the attached pad.
How do I cut laminate flooring?
A table saw or circular saw is best for ripping planks lengthwise. A miter saw or a specialized laminate floor cutter is best for crosscuts. Always cut with the decorative side up if using a hand saw, or decorative side down if using a circular saw, to minimize chipping.
Conclusion
Installing laminate over concrete is a highly rewarding DIY project that can dramatically improve a space. The key to a successful, long-lasting installation lies almost entirely in the preparation: ensuring the concrete is flat, clean, and properly sealed with a vapor barrier. Once the prep work is done, the actual clicking together of the planks is a fast and satisfying process.