
Attic insulation that is too thin, compressed, or missing in key areas fails to provide the necessary thermal resistance, known as R-value. Most homes built decades ago have insulation levels well below current recommendations, resulting in excessive heating and cooling demands. Homeowners can assess insulation effectiveness by observing physical symptoms and conducting basic inspections.
Understanding the common indicators of poor attic insulation helps prioritize improvements and ensures compliance with energy codes. This knowledge aids in selecting appropriate insulation types and thicknesses to optimize thermal performance. Addressing inadequate insulation is one of the most effective ways to enhance a home’s energy efficiency.
The impact of insufficient attic insulation extends beyond just energy costs; it can also affect the durability of the home’s structure. Excess heat escaping in winter or entering in summer can cause moisture buildup, leading to mold growth or wood rot. These issues compromise indoor air quality and the building envelope, making timely identification essential for long-term home health.
Many homeowners are unaware that attic insulation can degrade over time due to settling, pest intrusion, or damage from moisture. Even if the insulation was adequate when installed, its effectiveness may diminish, necessitating periodic reassessment. Regular monitoring ensures that insulation continues to perform as intended and provides lasting comfort and savings.
In addition to energy savings, properly insulated attics contribute to environmental benefits by reducing the home’s carbon footprint. Lower energy consumption translates to fewer greenhouse gas emissions, supporting sustainable living practices. Homeowners who invest in improving attic insulation not only enhance their comfort but also contribute positively to broader ecological goals.
Common Signs of Inadequate Attic Insulation
Identifying inadequate attic insulation often begins with observing household conditions that indicate heat loss or gain through the attic. High heating and cooling bills are a primary signal, reflecting the home’s struggle to maintain desired temperatures due to ineffective insulation. Additionally, rooms that remain uncomfortably cold during winter or excessively warm in summer may suggest insufficient attic insulation.
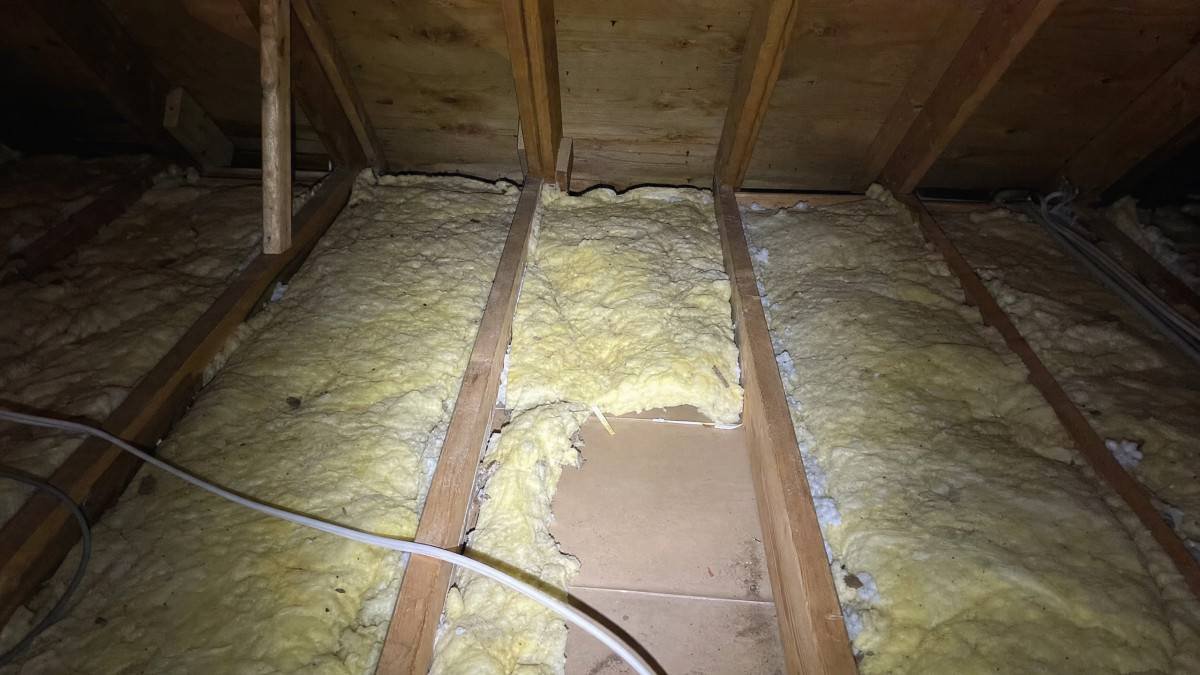
Another clear sign is the presence of ice dams on the roof during winter months. These occur when heat escapes through the attic, melting snow on the roof, which then refreezes at the eaves. Visual inspection of the attic can reveal physical signs such as visible joists above the insulation layer, indicating insufficient depth, or insulation that appears compressed and settled. Missing insulation around attic hatches also contributes to significant heat loss.
Uneven temperatures within the home, such as warm floors beneath cold ceilings, often point to poor attic insulation. Drafts felt near ceiling fixtures or along attic access points can also hint at insulation gaps or air leakage. In some cases, unusual condensation or frost buildup on attic surfaces during cold weather signals that warm, moist air is escaping and cooling prematurely, further indicating inadequate insulation.
Odors or signs of pest activity can also be related to insulation issues. Rodents and insects may nest in damaged or displaced insulation, reducing its effectiveness and creating health risks. Homeowners should be alert to musty smells or droppings, which often coincide with compromised insulation and ventilation problems, necessitating prompt inspection and remediation.
How to Inspect Attic Insulation Properly
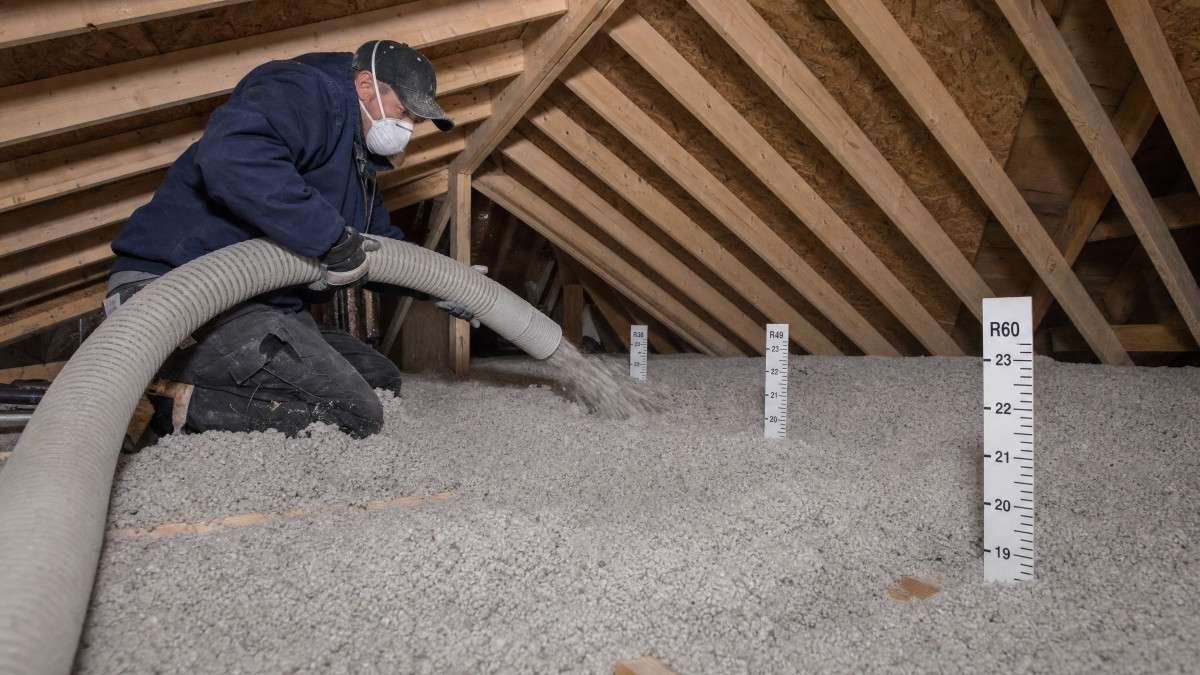
Proper inspection of attic insulation involves measuring its depth and assessing its condition. Using a ruler or measuring tape, homeowners can determine if the insulation meets recommended thickness levels, which varies depending on the type of insulation material. For instance, achieving an R-38 rating typically requires 10 to 14 inches of blown-in insulation. It is important to look for areas where insulation is compressed or unevenly distributed, as these reduce effectiveness.
Inspectors should ensure that insulation is not obstructing soffit vents, which provide vital attic ventilation. Checking the attic hatch for appropriate insulation and weatherstripping is also essential to prevent air leaks. Furthermore, examining penetrations such as light fixtures, plumbing, and wiring for air sealing helps maintain thermal integrity. Identifying gaps, voids, or damaged insulation allows for targeted remediation.
During inspection, it is advisable to carry a flashlight and protective gear such as gloves and a mask to safely navigate the attic space. Pay close attention to corners, edges, and areas around chimneys or ductwork where insulation is often lacking or disturbed. Taking photos or notes can aid in documenting problem areas and planning for insulation improvements.
In addition to visual and physical examination, homeowners can use infrared thermography cameras or thermal leak detectors to identify cold or hot spots. These tools reveal temperature differences that are not immediately visible, highlighting insulation deficiencies or air leaks. Combining these techniques with manual inspection provides a comprehensive evaluation of attic insulation performance.
Types of Attic Insulation and Their R-Values
Different attic insulation materials offer varying R-values, which measure their resistance to heat flow per inch of thickness. Common types include blown-in cellulose, blown-in fiberglass, fiberglass batts, and spray foam insulation. Blown-in cellulose provides an R-value between 3.2 and 3.8 per inch, while blown-in fiberglass ranges from 2.2 to 2.7 per inch. Fiberglass batts typically deliver R-values from 2.9 to 3.8 per inch, depending on the product.
Spray foam insulation offers the highest R-value, approximately 6 to 7 per inch, and also serves as an effective air sealant. The choice of insulation depends on factors such as budget, ease of installation, and the attic’s specific characteristics. Selecting the appropriate material ensures sufficient thermal resistance to meet or exceed regional energy code requirements.
Cellulose insulation, being made from recycled paper treated with fire retardants, is also considered an environmentally friendly option. Its ability to fill irregular spaces and conform to attic contours makes it ideal for retrofits. However, cellulose can settle over time, potentially reducing its effective R-value if not installed properly.
Spray foam insulation is available in two types: open-cell and closed-cell. Closed-cell foam is denser, providing superior insulation and moisture resistance, making it suitable for attics with moisture concerns. Open-cell foam is less dense and more affordable but offers lower R-value and vapor permeability. The choice between these depends on attic ventilation, moisture levels, and budget constraints.
R-Value Recommendations and Comparison of Insulation Options
Recommended R-values for attic insulation vary by climate zone, reflecting differences in heating and cooling needs. Lighter climate zones typically require R-values from 30 to 49, while colder regions mandate higher levels ranging from 49 to 60. Ensuring the attic insulation aligns with these guidelines optimizes energy efficiency and comfort year-round.
The following table compares common attic insulation types, their typical R-values per inch, approximate thickness needed to reach an R-38 level, and average installation cost ranges. This overview assists in evaluating options based on performance and budget considerations.
| Insulation Type | R-Value per Inch | Thickness for R-38 | Average Installation Cost (USD) |
|---|---|---|---|
| Blown-in Cellulose | 3.2 – 3.8 | 10 – 12 inches | 1,500 – 2,500 |
| Blown-in Fiberglass | 2.2 – 2.7 | 14 – 17 inches | 1,500 – 2,300 |
| Fiberglass Batts | 2.9 – 3.8 | 10 – 13 inches | 1,200 – 2,000 |
| Spray Foam (Closed Cell) | 6 – 7 | 5 – 6.5 inches | 3,000 – 5,000 |
While cost is a significant factor, evaluating insulation options should also consider durability, ease of installation, and potential for future maintenance. Fiberglass batts are often the most affordable and easiest to install for DIY projects but may leave gaps and compress over time. Blown-in options fill spaces more effectively but might require professional installation.
Local building codes or energy efficiency incentives may influence insulation choices by setting minimum R-value requirements or offering rebates for certain materials. Homeowners should research regional guidelines and potential financial benefits before selecting insulation to ensure compliance and maximize return on investment.
Fixes and Prevention for Inadequate Attic Insulation
Addressing inadequate attic insulation usually involves adding blown-in insulation over existing layers to increase thickness and improve thermal resistance. Prior to adding insulation, it is essential to air seal any penetrations such as gaps around pipes, wiring, and light fixtures to prevent heat loss through air leakage. Proper insulation of the attic hatch with weatherstripping also minimizes energy waste.
Care must be taken to ensure soffit vents remain clear to allow proper attic ventilation, preventing moisture buildup and structural damage. Preventative measures include routine inspections every five years and after any attic work to detect and correct insulation disturbances. Ensuring HVAC contractors and other service providers do not displace insulation during maintenance helps maintain consistent performance.
When adding insulation, it is important to avoid covering recessed lighting fixtures that are not rated for direct contact with insulation, as this poses a fire hazard. Specialized insulation covers or fixture replacements may be necessary to maintain safety while improving insulation levels. Consulting with professionals ensures compliance with safety standards and optimal installation practices.
In addition to insulation upgrades, improving attic ventilation complements insulation efforts by reducing moisture accumulation and regulating temperature extremes. Installing ridge vents, gable vents, or powered attic fans can enhance airflow, contributing to the longevity of insulation materials and preventing issues such as mold growth or ice dam formation.
Frequently Asked Questions
What is the recommended R-value for attic insulation?
The recommended R-value for attic insulation typically ranges from R-38 to R-60 depending on regional climate. Warmer climates may require R-30 to R-49, while colder zones often need R-49 to R-60. These levels ensure adequate thermal resistance to reduce heating and cooling costs and maintain indoor comfort. Local building codes often specify minimum requirements based on climate zones, which homeowners should follow to optimize energy efficiency.
What is the best insulation type for retrofitting an attic?
Blown-in cellulose or blown-in fiberglass insulation are commonly preferred for retrofitting attics. These materials can be installed over existing insulation to increase R-value without major disruption. Cellulose offers better coverage and air sealing properties, while fiberglass is often less expensive. The choice depends on attic accessibility, budget, and desired performance, with professional installation recommended to ensure even distribution and prevent settling.
How do ice dams form on roofs in relation to attic insulation?
Ice dams form when heat escapes through an under-insulated attic, warming the roof surface and melting snow. Meltwater runs down and refreezes at the colder eaves, causing ice buildup. Proper attic insulation minimizes heat loss, reducing the risk of ice dam formation. Alongside insulation, adequate attic ventilation helps maintain roof temperatures closer to outdoor conditions, further preventing ice dams and related damage.
Why is air sealing important before adding attic insulation?
Air sealing blocks gaps and cracks that allow warm or cool air to escape or enter the attic. Without air sealing, insulation alone cannot prevent energy loss effectively. Sealing penetrations before adding insulation maximizes the insulation’s thermal performance and improves overall energy efficiency. Air sealing also reduces drafts and moisture infiltration, protecting the building envelope and enhancing occupant comfort.
What is the typical cost of upgrading attic insulation?
Professional attic insulation upgrades generally cost between 1,500 and 3,000 US dollars, depending on insulation type, attic size, and existing conditions. Higher-cost options like spray foam may increase this range. Costs include material, labor, and any necessary air sealing work. Budget considerations should also account for potential energy savings over time, making insulation upgrades a cost-effective investment in home performance.
Conclusion
Detecting signs of inadequate attic insulation is essential for improving home energy efficiency, comfort, and reducing utility expenses. Physical indicators such as high energy bills, uneven room temperatures, and visible joists can signal insufficient insulation depth or condition. Conducting a thorough attic inspection and understanding insulation types and R-values enable informed decisions for upgrades.
Implementing fixes like adding blown-in insulation, air sealing, and insulating attic hatches can significantly enhance thermal performance. Regular inspections and maintenance prevent insulation degradation over time. Properly addressing attic insulation deficiencies contributes to a more comfortable living environment and long-term energy savings.